As I stated this is a non-routed VLAN that in our example will use the IP scheme of 192.68.1.X. The VLAN has a default gateway of 192.168.1.1, which is PIX 506E that has an outside interface on our Internet segment. All clients on this network are NAT'd through the PIX, completely seperate from our existing ASA cluster that's used for employees. This keeps the guest segment completely separate from our existing IP routing infrastructure. Here's an overview of the design.

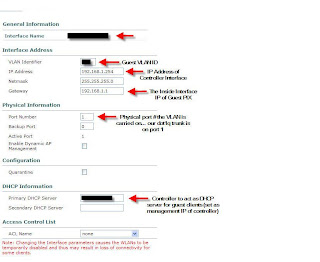
Now let's get into how this is configured on the WLAN Controller. Please note that the configuration is being done on version 4.0.206.0 of the WLC. The first step for creating a new WLAN is to create an interface on the controller for the clients. I'll be using the WLC GUI for the configuration. Go to CONTROLLER -> Interfaces -> New... This will bring you to the dialog to build in the new guest interface. Give the interface any name and tag the VLAN for the guest VLAN. So... in my example I'll use VLAN 125. Fill in the fields noted below.

The above image should explain this part of the configration for the most part. I'd just like to note the importance of the DHCP server option field. Ensure that you are placing the IP of the management interface of the controller. Using any other IP address on the controller will not work. Next lets build the DHCP pool that will be required for the clients. You have the option of using an external DHCP server, but we have opted to use the server local to the WLC. To access the DHCP options, click CONTROLLER -> Internal DHCP Server. Create a new scope and set the necessary options. I don't need to show this as it's very self-explanatory. Obviously we'll set the PIX as the "Default Router" and DNS is provided by an open DNS server on the Internet. You can use your own outside DNS server if you wish.
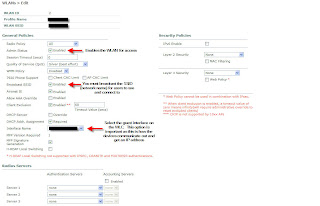
Our final step is to setup the WLAN... which for now will have no authentication. To create a WLAN... to to WLANs -> WLANs -> New... Give it an ID and the profile name can be "Open Access" and the WLAN SSID can be something like "Open Internet Access." This is the name of the WLAN that will be shown on the users laptops. Now lets get into the details. Note the options I have arrows next to.

Again... a pretty easy configuration. Once this step is complete you should be able to connect to your guest SSID and get Internet access. This is just the first step in providing Guest Access. In future posts I'll review enabling web authentication along with developing a customizable interface for users to register that ties into the WLC local user database. Leave feedback and let me know if you're unsure about anything or if I can help at all.
